MP-2S Manual Dual-Disc Metallographic Polishing Machine Guide: LCD Variable Speed Control and Precision Tips
Jin Cheng
2026-02-15
Tutorial Guide
This guide provides a clear, practical overview of the Laizhou Jincheng Industrial Equipment Co., Ltd. MP-2S manual dual-disc metallographic polishing machine, focusing on operation, reliability, and maintenance. It explains key features and typical application scenarios, highlighting the machine’s multifunction integration and quality-focused design for consistent metallographic sample preparation. A step-by-step walkthrough of the LCD interface details how to set and adjust variable speed control for different polishing stages, with actionable recommendations to improve surface finish, reduce defects, and enhance overall efficiency. The article also outlines the benefits of the high-strength fiberglass (FRP) body for corrosion resistance, durability, and stable continuous operation. Finally, it summarizes daily cleaning routines, periodic inspection checkpoints, and preventive practices to extend service life, while emphasizing the value of structured pre-sales guidance and responsive after-sales support for sustained performance. Readers are invited to share questions and field experiences through comments and Q&A to build a practical knowledge base for better polishing results.
In metallography, a “good-looking” surface is not the goal—repeatable, deformation-controlled preparation is. The MP-2S manual dual-disc metallographic polishing machine from Laizhou Jincheng Industrial Equipment Co., Ltd. is built for labs and quality teams that need stable rotation, easy speed control, and a straightforward workflow for both beginners and experienced technicians. This guide focuses on the LCD interface and variable-speed control settings, plus practical adjustments that typically improve surface consistency within the first week of use.
Where the MP-2S Fits in a Metallographic Workflow
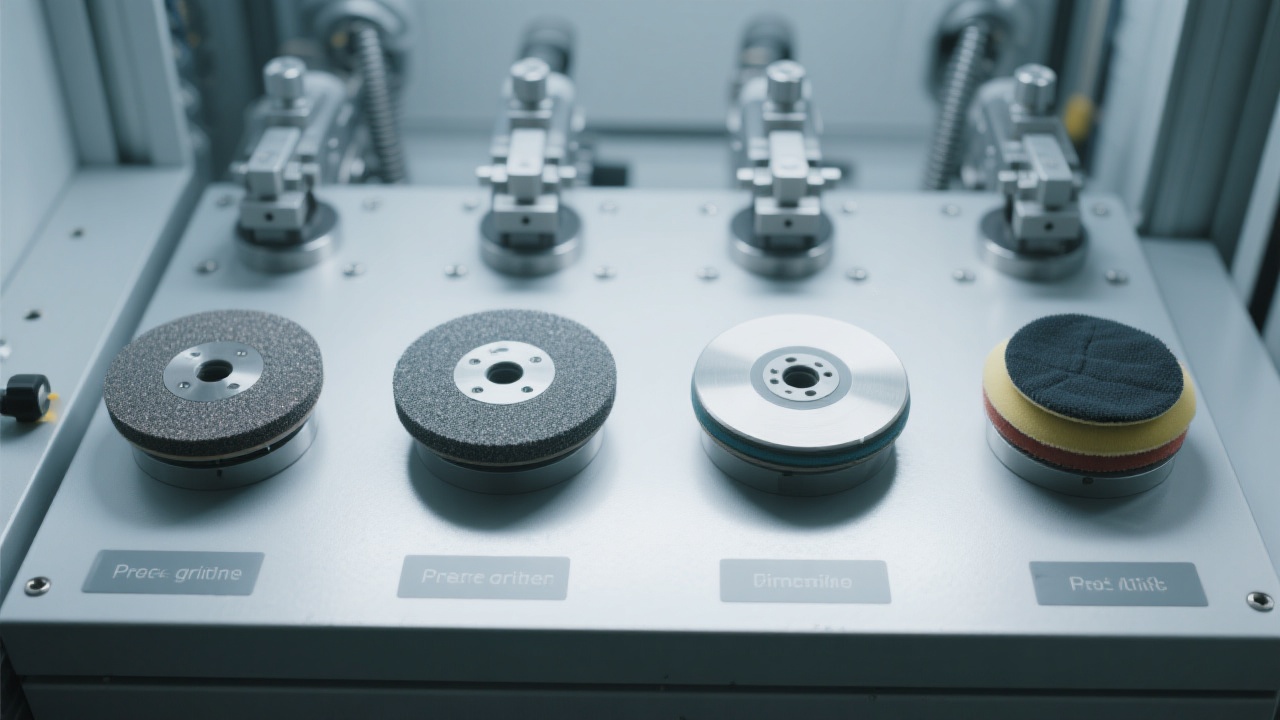
The MP-2S is commonly used after sectioning and mounting, and after the initial grinding steps. Its manual dual-disc design supports flexible combinations—e.g., one disc for fine grinding and the other for polishing—so technicians can reduce changeover time and keep consumables organized.
In routine lab practice, a controlled polishing stage can cut rework and microscope “false alarms.” Many QC labs report that improving preparation consistency can reduce repeat polishing attempts by 15–30% (typical internal KPI ranges), especially when multiple operators share the same equipment.
LCD Interface: Variable-Speed Control Setup (Step-by-Step)
A reliable LCD control panel is not just a convenience—it’s how a lab maintains comparable results between shifts. The MP-2S variable-speed control is typically used to match disc speed with abrasive size, material hardness, and the “feel” of the cloth or paper. The steps below reflect a practical lab routine designed to minimize operator-to-operator variation.
1) Pre-check Before Power-On
Disc & holder check: ensure the disc is seated flat and the working surface is clean (no trapped grit).
Consumable match: confirm the cloth/paper type matches the intended step (fine grinding vs. final polish).
Water/abrasive readiness: prepare controlled dispensing; inconsistent lubrication is a common root cause of random scratches.
2) Set the Target Speed on the LCD
For most metallographic polishing routines, a safe, repeatable approach is to start at a moderate speed, verify surface response, then adjust in small increments. Typical best-practice ranges used in many labs:
Stage
Typical Disc Speed (RPM)
Suggested Time
What to Watch
Fine grinding (pre-polish)
200–350
1–3 minutes
Uniform scratch direction and depth
Intermediate polishing
150–250
1–4 minutes
Fewer random scratches; low heat
Final polishing
80–180
30–120 seconds
Mirror finish without edge rounding
Many teams find that reducing speed by 10–20% during the final stage helps minimize pull-out and micro-smearing on softer alloys, while tougher materials may accept slightly higher speeds if lubrication is stable and pressure is controlled.
Practical Techniques to Improve Polishing Precision (Operator-Level)
Control Pressure Like a Process Parameter
In many labs, inconsistent pressure causes more defects than the “wrong” RPM. Keep pressure steady and light for final polishing. If the surface heats up noticeably or dries quickly, the pressure is usually too high or the lubrication is insufficient.
Use Small RPM Adjustments, Not Big Jumps
Treat RPM tuning as fine calibration. Adjust in steps of about 10–30 RPM, then re-check scratch pattern under a microscope. Large changes often hide the real cause (cloth saturation, abrasive contamination, or pressure drift).
Prevent Cross-Contamination Between Stages
The most common “mystery scratch” is a carryover particle from the previous step. Separate cloths/papers, rinse samples thoroughly, and keep wiping tools dedicated to each abrasive grade.
Match Lubrication to the Cloth Response
A cloth that looks “wet” is not always lubricated correctly. Aim for a stable thin film. Too dry increases smearing; too wet can reduce cutting action and cause uneven polish.
Why the High-Strength Fiberglass Body Matters (Stability = Repeatability)
In real production labs, polishing machines face repeated wet operation, chemical exposure from suspensions, and continuous duty cycles. A high-strength fiberglass body helps resist corrosion and supports structural stiffness, which contributes to steadier rotation and reduced vibration transfer—two factors that influence scratch uniformity and edge retention.
As a reference point, many QC teams track “surface acceptance rate” (samples passing microscopy without re-polish). When machine stability improves and parameters are standardized, acceptance rates often move from ~85–90% to ~92–97% in routine work (depending on material mix and operator training).
Maintenance That Extends Service Life (Daily, Weekly, Monthly)
A metallographic polishing machine performs best when maintenance is treated as part of the process—not an emergency response. Below is a practical schedule many labs adopt to protect speed consistency and reduce unplanned downtime.
Daily (5–10 minutes)
Clean splash areas and wipe residue from the work zone
Rinse discs/cloth plates and prevent abrasive buildup
Check power cord and emergency stop responsiveness
Weekly (15–25 minutes)
Inspect disc flatness and mounting tightness
Verify speed response across low/medium/high settings
Check for unusual noise/vibration (early fault prevention)
Monthly (30–45 minutes)
Deep clean around rotating components and guards
Document typical RPM settings by material & stage
Review consumable usage to prevent “expired slurry” issues
Service and Support: What Buyers Should Expect
For B2B labs, the true cost of a polishing machine is not only equipment ownership—it’s downtime, repeat work, and training time for new operators. A complete service system typically includes pre-sales parameter consultation, application guidance by material type, remote troubleshooting, and availability of maintenance parts. This support is particularly valuable when a lab is scaling throughput or standardizing preparation methods across multiple sites.
Many teams also build a simple internal knowledge base: “material → consumables → RPM → time → pass criteria.” When paired with consistent after-sales response, this approach tends to stabilize output and shorten onboarding for new technicians.
Common Questions from New Users (Quick Answers)
Why does the surface look shiny but still fail under the microscope?
A shiny surface can still have subsurface deformation or random deep scratches. Lower the final polishing RPM, reduce pressure, and verify that no coarse particles are carried into the last step.
What’s the fastest way to reduce “mystery scratches”?
Separate consumables by stage, rinse the sample thoroughly between steps, and clean the working area daily. In many labs, contamination explains the majority of non-repeatable scratches.
When should the operator change RPM instead of changing consumables?
If the scratch pattern is uniform but removal is too slow, a small RPM increase may help. If random scratches appear, changing consumables and cleaning is usually the first priority before RPM changes.
Get Your MP-2S Setup Checklist + Recommended RPM Map
If you share your material type (steel, aluminum, copper alloys, heat-treated parts, etc.) and your current consumables, a practical RPM and time map can be proposed for the MP-2S manual dual-disc metallographic polishing machine—so your team can reach stable, repeatable finishes with fewer re-polish cycles.
Prefer a quick exchange? Leave a question in the comments with your material grade and target standard, and the most common parameter pitfalls can be addressed.
2026-02-04|439|metallographic prepolishing machine maintenancepreventive maintenance for lab equipmentgrinding disc cleaning frequencymotor temperature control in lab machinesindustrial lab equipment reliability


Hardness-TesterHVS-1000-1.jpg?x-oss-process=image/resize,m_fill,h_800,w_800/format,webp)


